What's new

Pakistan irrigation System updates

ghazi52

PDF THINK TANK: ANALYST
Joined
Mar 21, 2007
Messages
101,790
Reaction score
106
Country
Pakistan
Location
United States
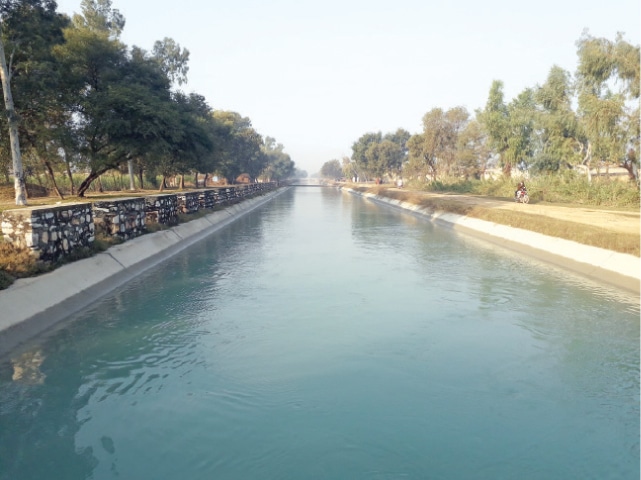
Pehur canal to irrigate two million kanals arid land in Swabi
Muqaddam Khan

February 25, 2020


5e54304e32c29.jpg

The completed portion of Pehur canal, Swabi. — Dawn


SWABI: A total 2,000,000 kanals arid land in the district would be irrigated through Pehur High Level Canal Extension Project (PHLCEP), sources told Dawn here on Monday.

They said that Asian Development Bank (ADP) would provide funds for the project. The total cost of the project, which will be completed within three years, is Rs18 billion. Work on the project was inaugurated in August but recently more areas included in it.

Sources said that the extension project was divided in three main regions and in each area a flawless mechanism would be set up to irrigate both in summer and winter different crops that were expected to be grown in the barren land of the district.

In Jhunda-Boka part, a total 3,492 acres land would be irrigated through the project, said sources. They added all arid land in the region and its suburbs would be brought under the canal irrigation system.

Project to be completed within three years at a cost of Rs18 billion

In Anbar, 669 acres infertile land would be irrigated through pressure pipe system, said the sources. They added that a total 15,437 acres barren land was expected to be irrigated in Indus Anbar region.

Keeping in mind the increasing irrigation requirements of the crops, it has been planned that under this project more 10,932 acres land can be irrigated in future as well.

Sources said that 100 exhibition agriculture flats would be established and women would be given 10 per cent representation in it. They said that women would be enabled to earn their livelihood with dignity and honour.

They said that water association would be formed at every water course level and participation of women was must in it. It has also been planned that clothes washing points would be built along the canal to provide an opportunity to the womenfolk of the region to wash their clothes comfortably.

Sources said that 77.8-kilometre road at the edge of the extension canal would be constructed to facilitate people to take their yield to the market easily. The farmers would be benefited from the road and improved communication system.

Meanwhile, Kasthkar Coordination Council (KCC) set up a protest camp at Karnal Sher Khan Chowk against alleged exploitation of farmers by tobacco buyers and rejected the rate of Rs200 per kilogram tobacco fixed by government.

Talking to journalists at the camp, KCC president Azam Khan said that all the benefits of the crop went to national and multinational companies.

The camp would remain intact on Tuesday and Wednesday.

KILLED: Two people were killed and four received injuries in three different road accidents here on Monday, said police. They said that a man identified as Peer Mohammad was killed and three others were injured when an auto-rickshaw collided with a roadside power pylon on Shakrai Road.

Similarly, Salman Khan was killed when a tractor-trolley hit him on Swabi-Mardan Road.

Also, Masood Khan was seriously injured when a van hit him on Shewa-Asota Road.

Published in Dawn, February 25th, 2020
 
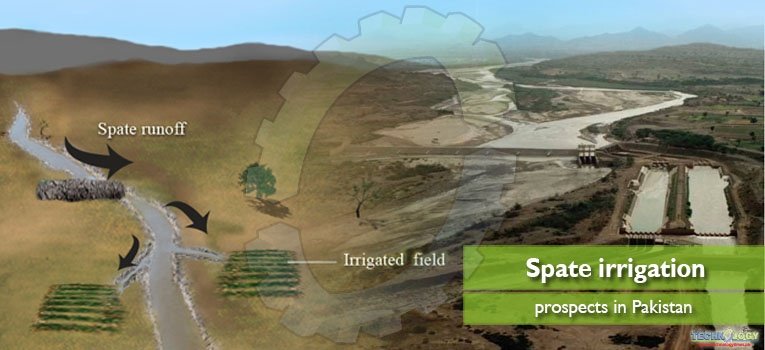
Spate irrigation prospects in Pakistan

khuram mubeen

Assistant Professor Agronomy MNS University of Agriculture Multan

On an average 9% of the irrigated area of Pakistan is under the system of hill ********. Though there is a potential of increasing the area under spate irrigation up to 34%.


Spate-irrigation-prospects-in-Pakistan.jpg


Floods are often considered as havoc. However, the other side of coin has seldom been accounted for in a positive context. Rain water from dry mountains can be a potential source for irrigating low lying fields, and getting a reasonable crop production.

Floods in plains through rise in level of river flow and floods originating from mountainous areas (Hill ******** / Rod Kohi) differ from each other. The floods from rivers builds gradually, has a long lasting impact and recedes even more slowly.

On the other hand, hill ******** from mountains are transient (usually up to 10 hours) and appear shortly after rains. Speed of water flow is very high as compared to floods of rivers in plains.

What is spate irrigation?

The irrigation technique that diverts flood water from dry mountainous area by gravity through regulatory structures for crop cultivation in low lying farmland is referred to as spate irrigation. This irrigation system is a distinct feature of arid and semi-arid regions bordered by highlands.

There are two systems of management in hill torrent areas:

  1. Upland rod kohi areas. Here check dams are built to create obstacles in the movement of speedy water. It aids in reducing losses to soil erosion. Contouring, terracing is practiced and mini dams are also constructed. Medium reservoirs can also be built where feasible.
  2. Lowland rod kohi areas: In such areas regulatory structures, diversion bunds, headworks, field inlets and field outlets can be constructed. For smooth flow of water and to avoid erosion, water can be conveyed through an array of channels like stone masonry lined channels, closed channels, parabolic lined channels, plastic sheet lined channels and open channels etc. A well planned channelization of the water from river bed at the take-off point will make the most use of the area with better coverage and spread of water with effective groundwater recharge.
On an average, currently 9% of the irrigated area of Pakistan is under the system of hill ********. Though there is a potential of increasing the area under spate irrigation up to 34%. About 1.4 to 2.34 million hectare area is under spate irrigated agriculture. Nevertheless, the potential area is approximately 7 million hectares.


Following three aspects must be inculcated to harvest the benefits from hill ********

  1. Building regulatory structures
  2. Canal maintenance and repair system
  3. Management of commanded area of the hill ********

Essential aspects to harness hill ********

Building dams, mini dams, headworks, regulatory structures etc. is the major responsibility of engineering authorities whereas command area management is a diverse subject involving multiple stakeholders. The bund repair and maintenance in such areas is of utmost importance.

In some areas, there is penalty on farmers who do not take care of repairing and maintaining bunds on annual and sometime on seasonal basis. Moisture conservation can be enhanced by ploughing, surface mulching, strip cropping, and growing cover crops like legumes etc.

Pakistan’s scenario

Pakistan has the largest area in the world under spate irrigation with maximum area being in Balochistan. In Punjab, this sort of irrigation is practiced in districts of Dera Ghazi Khan and Rajanpur and parts of Mianwali. There are 13 major hill ******** besides many minor ******** locally called “chur”.

In Khyber Pakhtunkhwa spate irrigation is practiced in Dera Ismail Khan and parts of Lakki Marwat and Kohat. In Sindh, it is mostly practiced in the northwestern Kirthar range along Dadu, Jamshoro and reaching up to part of Karachi district. There are 25 hill torrent systems in Sindh. Balochistan has 44% area of the country by geography.

However, only 13% area of Balochistan is irrigated. There are 19 major spate irrigation systems in Balochistan.
Government through irrigation department has established hand pumps for drinking water in some villages but still in many areas the human and animals drink water from the ponds or from water collected in depressions made by soil transportation and erosion.

Water rights are not followed in their true essence in most of the spate irrigated areas. If in dry years, a small volume of water is received through rainfall, the farmers at upstream have the rights to use it. But as a malpractice, influential people and those at upstream divert the water flow during wet years to their lands which results in non-availability or very limited water availability to farmers at tail of the command area.


Traditionally, at field level, tactical breaching of field bunds is done for field to field irrigation. However, it damages the bunds sometimes besides several other adverse ecological and social impacts.


Field management

On field management include selection of suitable crop and cultivars which require less water till maturity and can withstand dry spells and hot weather in summer. Sorghum and millets can be successfully grown and seeds of these crops are threshed at harvest for future use while their stalks can be dried for hay to feed livestock.

Mulching, tillage, strip cropping, using leguminous crops in the cropping system improves soil conditions and soil moisture holding capacity. Millet, cluster bean and mungbean is used in different areas in summer. In winter season chickpea, rapeseeds, mustards and wheat are mostly grown in different areas.

Dug well irrigation is also in practice in some areas like Mithawan hill torrent command area.
As the farmers do not use external inputs in subsistence farming; therefore, the returns from the field crops are also marginal.


Problem solution
  • There is a need to build a database of spate irrigation in the country. Currently, there is very little academic research regarding key aspects of spate irrigation. Wherever feasible, spate irrigation should be augmented with judicious groundwater use.
  • Improvement in indigenous vegetables, trees and fodder should be included in research program for improving the intended benefits. In most of the areas as the produce from the fields are obtained without using any chemical, there is a huge potential for developing commodity specific organic markets.
  • Thal and Cholistan Development Authorities, rod kohi development authorities on at least province level should be initially established having experts from disciplines of agriculture, livestock, health, forestry and education etc. There should be concrete efforts for promoting the focus on fodder, pulses, oilseeds and wheat etc. using available water supply.


Scientific solutions

  • Research should be focused on breeding crop cultivars that can extract water from deeper soil depths.
    Creating awareness and coordination among all the society groups is need of the time. On farm water management through active involvement of irrigation, engineering, conservation, agriculture and extension departments etc. can bring a significant change.
  • Research should also be focused on developing drought tolerant fruit plants like Beri and Dates. There is potential of planting more forest trees in spate irrigated areas. This will also reduce the soil erosion and avoid negative consequences of climate change besides other benefits.
  • Low cost drinking water technologies for humans and livestock consumption should be taken into account on priority basis. As the area is drought prone with water scarcity, hence growing crops through high efficiency irrigation systems like drip irrigation can bring fruitful results where applicable.
  • Engineering and agricultural faculties of universities should incorporate spate irrigation curriculum for capacity building and preparing scientific brains in future perspective. It is of utmost importance to include spate irrigated area into national development plan.
An integrated approach unveiling all these aspects will definitely promise uplift in the socio-economic lives of poorest of the poor farmers in country.
 
Clay Pot Irrigation System


The Potter’s Method


41.jpg


You can make your own ollas by hand with wet clay using several methods. However, no matter which one you use, the pots will need to be fired in a kiln, which can usually be found at a clay store, pottery studio, and at a college or university. The pots are made from a mixture of clay and sand at a ratio of 4:1, which will give it an effective porosity ranging from 10-15%. Depending on the clay, you can add, rice hulls, or sawdust at a ratio of up to 1:4 to increase the porosity of the pots. You could also simply add more sand, although using a more crude, impure clay
(which has a varied mix of particulate sizes) will result in larger pores during the firing process. Or, you can mix 20% sand with 20% quality clays, or the same percent of sifted rice hulls or sawdust. After mixing the clay, use a potter’s wheel to mold it into different shapes, typically with a spherical or round body and a flat bottom. The pots are then tempered by baking them at high temperatures.

Firing the ollas makes the clay hard and strong, while still allowing water to pass through. The temperatures required can vary, depending on the quality and mixtures of your clay, the type of oven used when baking, and your desired porosity, and could range anywhere from 200° to over 1,000° C. Small-scale, earthen-ware manufacturers generally temper their ceramic pots at 1200° C. A course, red clay with sand impurities and a mixture with 20% or less of straw should be fired at around 800° F, or around 430° C. Closed-oven firing at temperatures exceeding 450° C are ideal. Generally, the pots should not be fired much above 1,000° C, or their porosity will be limited. Adding more grog (ground old ceramic) will increase porosity by burning out the filler, leaving uniform pores and a high-quality pot. It is important to find the optimum temperature for your pots. If you make it too hot, the clay will become water-tight, making the ollas useless for our purposes. However, if the pots are not heated enough, then they may breakdown in the soil, causing leakages.

The Coil-Method

This method builds the pot piece-by-piece, in layers from the bottom up, by laying long, rolled coils on top of each other around the sides of a bowl or plate to build the pot. Begin by pinching a ball of wet clay to create a bowl-shape. Use this as the base of your olla, and build up around it from there. Or, you can take the bottom of an old, terra-cotta plate (puki), and lay down a tortilla-shaped piece of clay on top of it. Then, roll a lump of clay between your palms, creating a long clay rope of uniform thickness, and form the base of the olla by pinching and pressing this coil onto the sides of the clay tortilla with one hand, while turning the bowl or puki with your other hand. Add successive layers of coils until the vessel is completed.

DlEhmVgW4AAA-V7.jpg


The Casting Method

You can also make the jars out of a mold-casting. This is an excellent way to mass-produce ollas if you can successfully cast them. To make the urns, create plaster of Paris molds from pumpkins, squash, or gourds of various sizes. Then pour liquid clay into the molds to shape the urns, and fire them in the kiln to solidify the clay.

Using Milk Jugs as Ollas


You can also repurpose some used 1-gallon milk jugs to turn them into artificial ollas. Take your empty milk jugs, fill them with water, and freeze them overnight. Poke multiple small holes into the sides of the jug with a nail or ice pick and hammer. When planting near a wall or walkway, you may want to poke holes on only two sides of the jug, so that the water flows to your plants and not on your pathway. Bury the milk jugs, plant, and water in the same manner as the ollas.

Burying and Watering The Ollas

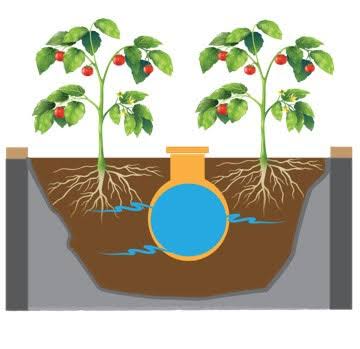
Start by digging a planting hole about three times as wide and twice as deep as the clay pot. If you encounter clay in your topsoil, discard and replace it with finer, higher-quality soils, as it makes it hard for the water to penetrate. In very heavy soil, you may wish to add sand or gypsum to improve its characteristics. In either case, you will want to fertilize the soil to add more nutrients for the plants. Simply take half of the soil you just removed, break it up using a spade or fork, and add it back into the bottom of the pit. Take the other half of the soil and mix in 1/3 of compost, aged manure, fertilizer, or potting mix with dolomite.

Before burying the ollas completely, it’s best to first fill them and check for leaks. Once that’s done, place the pot in the pit on top of the loose soil, and fill the pit around it with the fertilizer-soil mix. Then bury it up to its neck so that the top is about 2 cm above the surface of the surrounding soil. The top of the clay pot should remain exposed above ground so it can be refilled. To make the top of the pots easier to see, and to reduce evaporation, paint the top rims with white paint. The upper body of the buried clay pot can also be partially painted to reduce water use, but be sure your paints do not include any harmful materials, such as lead or cadmium.

When finished burying the pots, put mulch around the exposed neck at the surface to reduce water evaporation. Then, fill them with water and put a cover over the opening. Keeping the mouth of the jar fully covered prevents insects, animals, and debris from getting inside, in addition to reducing water loss through evaporation. If there are no fitted lids for the jars, you can use corks, plastic lids, cups, metal dishes, flat rocks, clay plates, shells, ceramic tiles, or even pot holders, depending on the size of the hole.

Water takes between 24 and 72 hours to flow through an olla. Depending on factors such as the plant’s water needs, pot size, soil type, time of year, and environment, the ollas may need re-filling every 2 to 3 days for small pots, or once or twice per week for larger ones. To keep the system working optimally, add more water to the pots as needed, and avoid letting them get completely dry. In order to avoid build up of salt residues along the inside surface of the olla that may prevent desired seepage, add water whenever the water level in the olla falls below 50%.

Domestic water effluent, or greywater from kitchens, can be used to refill the pots. Although, it should be filtered first, or otherwise it will clog the pours. You may also supply the olla with water mixed with liquid fertilizer. Simply mix the fertilizer or compost seed in the water, and use it as normal. The liquid fertilizer is more expensive than the granular kind, although, with the liquid variety, you’ll only need about 1/4 to 1/2 of the amount (per unit area of land) compared to granular fertilizers. This is due to the tremendous efficiency of the delivery of nutrients directly to the plant’s roots. Do not add this too often, however, as particles could build up and clog the pours in the clay.

Planting With Ollas

The system is useful for annual and perennial plants, woodlots, and horticultural, orchard or plantation crops. Tests and research conducted around the world — including China, Pakistan, India, Mexico, Brazil, Iran, California, Arizona, and New Mexico – have found that the following plants are suitable to use with clay pot irrigation:
  • Asparagus
  • Basil
  • Beans
  • Bee Balm
  • Broccoli
  • Cabbage
  • Celery
  • Cilantro
  • Collard Greens
  • Corn
  • Chiles
  • Chiltepines
  • Chives
  • Cucumbers
  • Eggplant
  • Garlic
  • Leeks
  • Marigolds
  • Melons
  • Mints
  • Onions
  • Parsley
  • Peppers
  • Peas
  • Poppies
  • Potatoes
  • Purslane
  • Rosemary
  • Rhubarb
  • Scallions
  • Shallots
  • Strawberries
  • Squash
  • Sunflowers
  • Tarragon
  • Thyme
  • Tomatoes
  • Tomatillos
  • Yarrow
No research seems to be available on the consequences of using ollas in a dense polyculture. However, many other intercrops should work well with buried clay pots. The Fan Sheng-chih Shu, an ancient Chinese text describing clay pot irrigation, recommends planting 10 scallions around the pot, interspersed with four melon seeds, and to harvest them in the 5th month as the melons begin to ripen. Lesser beans can also be planted in with the melons and scallions. If growing root vegetables, like potatoes, then bury the ollas a bit deeper in the soil.

You can plant from cuttings or transplants, or you can raise seedlings in situ instead of transporting them from nurseries. However, ollas are not very good for seed germination, as there won’t be enough surface moisture to water them. A small amount of water should be added to the seed spot or transplant to help wet the soil and establish capillary action from the buried clay pot. If starting with plants that already have roots, water the surface until their roots grow low enough to establish themselves. If planting with cuttings, try setting up a double clay pot to propagate them. Take a sealed pot and set it inside a larger one with an open drain. Fill the space between them with sandy potting mix, and put the cuttings in there. This way, they will be kept moist but still get oxygen.

It has been noted that plants with thick roots, and those with woody perennial plant root growth, will likely grow right through the pots and break them. This makes the pots less useful for long-term tree irrigation, but they can still be used for system establishment. Trials in Pakistan using 8-inch clay pots, refilled every two to four weeks, showed that tree seedlings irrigated with buried clay pots had a survival-rate of 96.5%, compared to 62% for hand watering. The seedlings grown with buried clay pots were also 20% taller. After eight months, all tree seedlings grown around the pots were alive and well, while all of the trees irrigated with the same amount of water using basin irrigation had died. Examination of the root distributions showed that several roots had wrapped themselves around the pot, while two dominant tap roots went straight down to considerable depth. This shows that buried clay pot irrigation can help develop a sufficient root system for long term survival and permanent installation of fruit, nut, and desert trees like pistachio, mesquite, acacia, or eucalyptus. The pot only needs to be filled regularly during the first year and can then be removed.

Be careful when producing fast-growing and spreading plants, like squash and melon vines with big leaves, as they may not be able to get enough water in some situations. Some sensitive species of plants could also be prone to pest or disease because of the constant levels of moisture in the soil. Heavy rains could exacerbate these problems when too much extra moisture is added to the garden. Beware of plants with invasive root systems, as they can grow out horizontally to steal water from the ollas.
When planting with ollas, there is the potential for breakage if left in the ground in areas with a winter freeze. In temperate climates, dig the pots up at the end of the growing season to prevent breakage. Burying the pot further underground, about 4-inches or so under the surface, may help protect it from freezing. The longevity of most ollas (without frost) is unknown, but estimated to be 2- to 5-years, depending on the quality of the clay, the mineral content in the water, and soil temperature swings. Prolonged use is likely to decrease porosity and clog up the pots over time. If this happens, soak the pots in water and scrub them clean, or re-fire to clear out the pores.

ollatable.jpg


Spacing


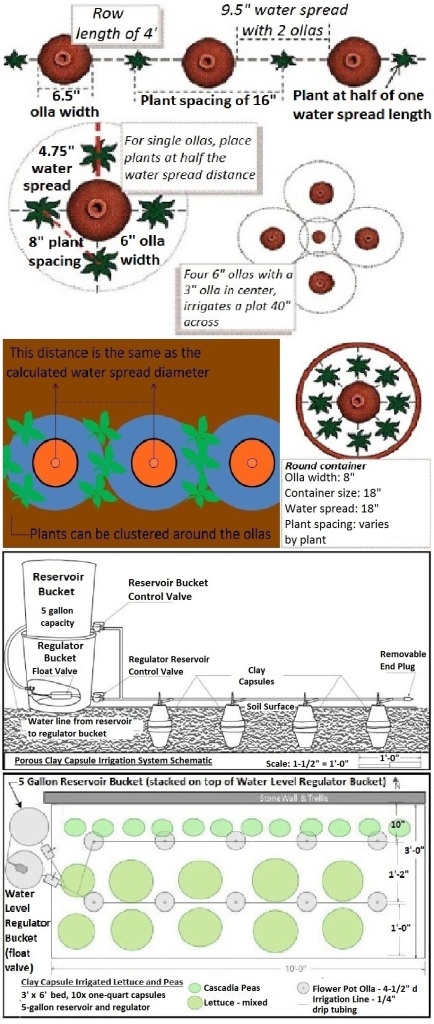
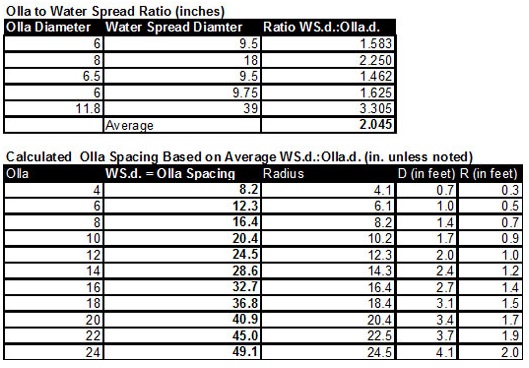
The correct spacing of your plants will depend on the shape and size of the ollas, and of the crops you’re growing. Not much research is available as to the optimal spacing of plants around the ollas, but some women in the developing world used clay pots with a capacity of 5-liters each, and buried them at 0.5 m intervals in prepared seed beds. Ancient practices buried many pots on large swaths of land, using 530 pits per hectare (210 pits per acre), with each pit being 70 cm (24-inches) across and 12 cm (5-inches) deep. To each pit was added 18 kilograms (38 lbs.) of manure, and mixed well with an equal amount of dirt. An earthen jar of 6-liters (1.5-gallons) was buried in the center of the pit and filled with water to the brink.

Pots of about 1.5-gallons will seep water out to about 18-inches. The general rule of thumb is that each olla will water outwards at a distance about the same length as its radius. For optimal water utilization, arrange the pots in clusters, separated from each other at a distance equal to the width of their diameter or more, and plant in circles around them within about 18-inches around the base of the pot. In general, place your pots about 3 m (9-feet) apart for vine crops, and 1-1.5 m (3- to 5-feet) apart for corn and other tall-growing plants. The seeds or plants should be placed no less than about 1/2 of the radius away from the edge of the pot, and no more than the length equal to the diameter away from the edge, to maximize water absorption. It is helpful to leave a space between plants on one side of the pot to make it easier to lift the lid and refill it as the plants grow larger. You can also use pots in raised beds and containers. Simply use the 1-radius rule to find out how large your containers and beds need to be.
 
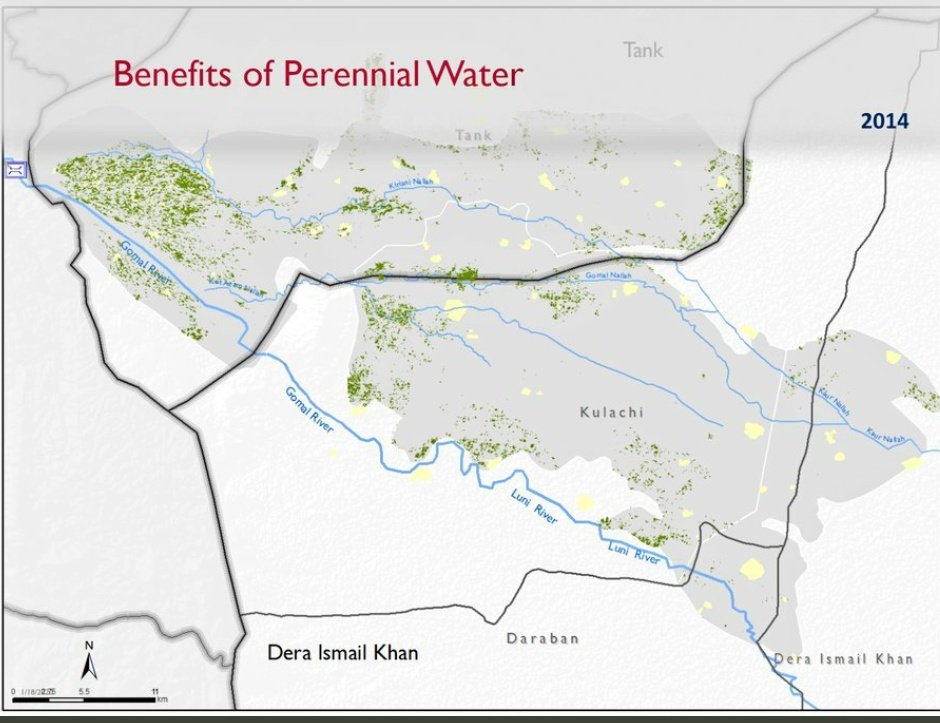
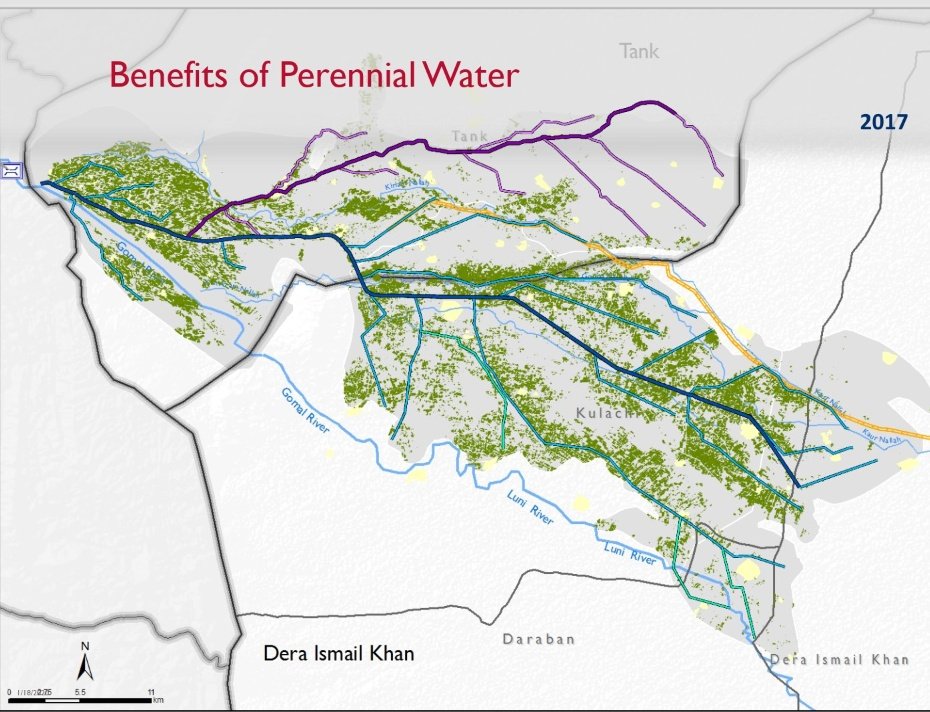
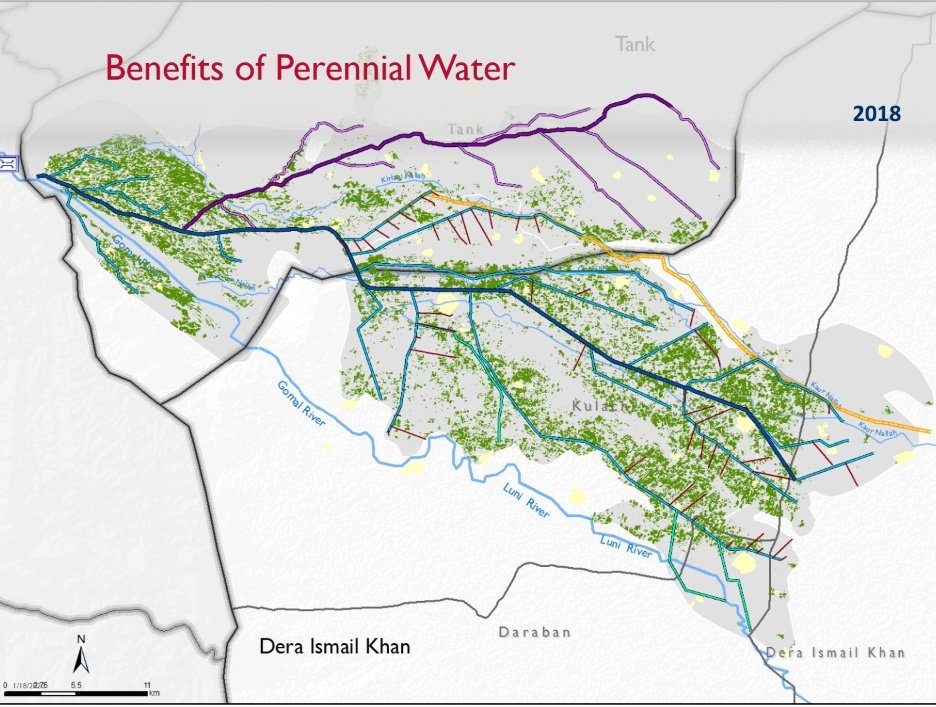
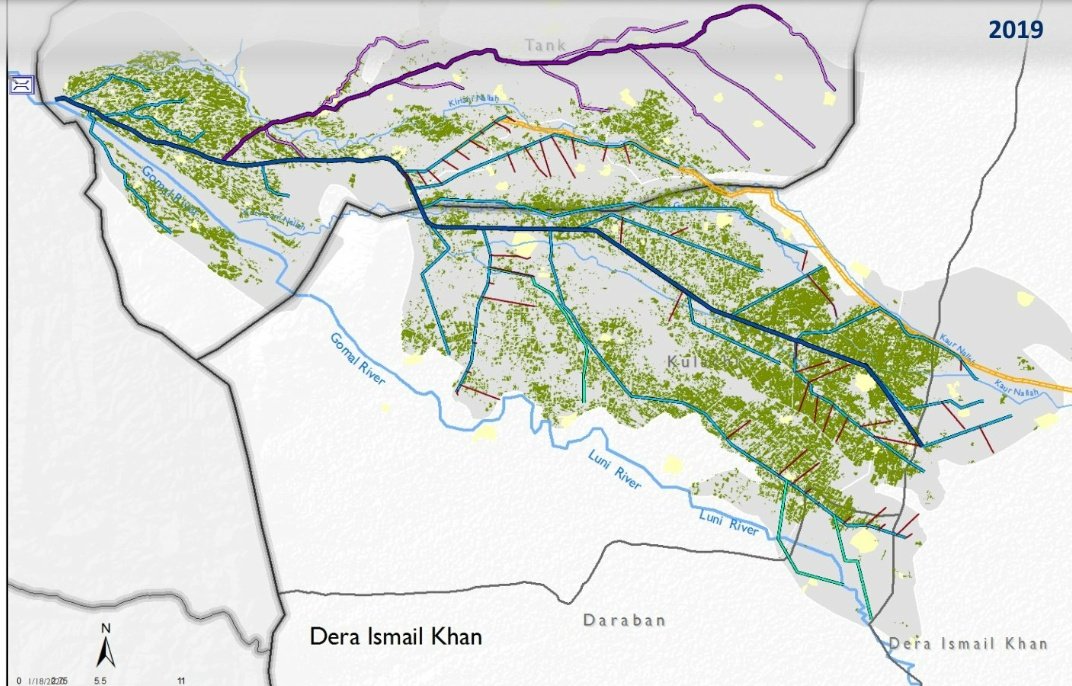
Satellite images Gomal Zam Dam command area before/after completion, green revolution, created thousands of jobs, ensuring food security & positive Climate impact, Pakistan needs more dams + shift to water efficient agriculture .


EYSY5HpXYAEj2em


EYSY5uRXgAEHYu3


EYSY6S4X0AAngmg


EYSY67GX0AEJITK


.
Dam(n) that's amazing mashallah
 
Sukkur, Sindh

97980270_158723252323421_4232811663163654144_n.jpg


Ghazi Barotha, KP / Punjab


98600189_158723345656745_4770148707964289024_n.jpg


Balochistan


97531276_158723978990015_825223630295138304_n.jpg


Punjab

98333117_158724275656652_7995758031608479744_n.jpg
 
Last edited:
Clay Pot Irrigation System


The Potter’s Method


41.jpg


You can make your own ollas by hand with wet clay using several methods. However, no matter which one you use, the pots will need to be fired in a kiln, which can usually be found at a clay store, pottery studio, and at a college or university. The pots are made from a mixture of clay and sand at a ratio of 4:1, which will give it an effective porosity ranging from 10-15%. Depending on the clay, you can add, rice hulls, or sawdust at a ratio of up to 1:4 to increase the porosity of the pots. You could also simply add more sand, although using a more crude, impure clay
(which has a varied mix of particulate sizes) will result in larger pores during the firing process. Or, you can mix 20% sand with 20% quality clays, or the same percent of sifted rice hulls or sawdust. After mixing the clay, use a potter’s wheel to mold it into different shapes, typically with a spherical or round body and a flat bottom. The pots are then tempered by baking them at high temperatures.

Firing the ollas makes the clay hard and strong, while still allowing water to pass through. The temperatures required can vary, depending on the quality and mixtures of your clay, the type of oven used when baking, and your desired porosity, and could range anywhere from 200° to over 1,000° C. Small-scale, earthen-ware manufacturers generally temper their ceramic pots at 1200° C. A course, red clay with sand impurities and a mixture with 20% or less of straw should be fired at around 800° F, or around 430° C. Closed-oven firing at temperatures exceeding 450° C are ideal. Generally, the pots should not be fired much above 1,000° C, or their porosity will be limited. Adding more grog (ground old ceramic) will increase porosity by burning out the filler, leaving uniform pores and a high-quality pot. It is important to find the optimum temperature for your pots. If you make it too hot, the clay will become water-tight, making the ollas useless for our purposes. However, if the pots are not heated enough, then they may breakdown in the soil, causing leakages.

The Coil-Method

This method builds the pot piece-by-piece, in layers from the bottom up, by laying long, rolled coils on top of each other around the sides of a bowl or plate to build the pot. Begin by pinching a ball of wet clay to create a bowl-shape. Use this as the base of your olla, and build up around it from there. Or, you can take the bottom of an old, terra-cotta plate (puki), and lay down a tortilla-shaped piece of clay on top of it. Then, roll a lump of clay between your palms, creating a long clay rope of uniform thickness, and form the base of the olla by pinching and pressing this coil onto the sides of the clay tortilla with one hand, while turning the bowl or puki with your other hand. Add successive layers of coils until the vessel is completed.

DlEhmVgW4AAA-V7.jpg


The Casting Method

You can also make the jars out of a mold-casting. This is an excellent way to mass-produce ollas if you can successfully cast them. To make the urns, create plaster of Paris molds from pumpkins, squash, or gourds of various sizes. Then pour liquid clay into the molds to shape the urns, and fire them in the kiln to solidify the clay.

Using Milk Jugs as Ollas


You can also repurpose some used 1-gallon milk jugs to turn them into artificial ollas. Take your empty milk jugs, fill them with water, and freeze them overnight. Poke multiple small holes into the sides of the jug with a nail or ice pick and hammer. When planting near a wall or walkway, you may want to poke holes on only two sides of the jug, so that the water flows to your plants and not on your pathway. Bury the milk jugs, plant, and water in the same manner as the ollas.

Burying and Watering The Ollas

Start by digging a planting hole about three times as wide and twice as deep as the clay pot. If you encounter clay in your topsoil, discard and replace it with finer, higher-quality soils, as it makes it hard for the water to penetrate. In very heavy soil, you may wish to add sand or gypsum to improve its characteristics. In either case, you will want to fertilize the soil to add more nutrients for the plants. Simply take half of the soil you just removed, break it up using a spade or fork, and add it back into the bottom of the pit. Take the other half of the soil and mix in 1/3 of compost, aged manure, fertilizer, or potting mix with dolomite.

Before burying the ollas completely, it’s best to first fill them and check for leaks. Once that’s done, place the pot in the pit on top of the loose soil, and fill the pit around it with the fertilizer-soil mix. Then bury it up to its neck so that the top is about 2 cm above the surface of the surrounding soil. The top of the clay pot should remain exposed above ground so it can be refilled. To make the top of the pots easier to see, and to reduce evaporation, paint the top rims with white paint. The upper body of the buried clay pot can also be partially painted to reduce water use, but be sure your paints do not include any harmful materials, such as lead or cadmium.

When finished burying the pots, put mulch around the exposed neck at the surface to reduce water evaporation. Then, fill them with water and put a cover over the opening. Keeping the mouth of the jar fully covered prevents insects, animals, and debris from getting inside, in addition to reducing water loss through evaporation. If there are no fitted lids for the jars, you can use corks, plastic lids, cups, metal dishes, flat rocks, clay plates, shells, ceramic tiles, or even pot holders, depending on the size of the hole.

Water takes between 24 and 72 hours to flow through an olla. Depending on factors such as the plant’s water needs, pot size, soil type, time of year, and environment, the ollas may need re-filling every 2 to 3 days for small pots, or once or twice per week for larger ones. To keep the system working optimally, add more water to the pots as needed, and avoid letting them get completely dry. In order to avoid build up of salt residues along the inside surface of the olla that may prevent desired seepage, add water whenever the water level in the olla falls below 50%.

Domestic water effluent, or greywater from kitchens, can be used to refill the pots. Although, it should be filtered first, or otherwise it will clog the pours. You may also supply the olla with water mixed with liquid fertilizer. Simply mix the fertilizer or compost seed in the water, and use it as normal. The liquid fertilizer is more expensive than the granular kind, although, with the liquid variety, you’ll only need about 1/4 to 1/2 of the amount (per unit area of land) compared to granular fertilizers. This is due to the tremendous efficiency of the delivery of nutrients directly to the plant’s roots. Do not add this too often, however, as particles could build up and clog the pours in the clay.

Planting With Ollas

The system is useful for annual and perennial plants, woodlots, and horticultural, orchard or plantation crops. Tests and research conducted around the world — including China, Pakistan, India, Mexico, Brazil, Iran, California, Arizona, and New Mexico – have found that the following plants are suitable to use with clay pot irrigation:
  • Asparagus
  • Basil
  • Beans
  • Bee Balm
  • Broccoli
  • Cabbage
  • Celery
  • Cilantro
  • Collard Greens
  • Corn
  • Chiles
  • Chiltepines
  • Chives
  • Cucumbers
  • Eggplant
  • Garlic
  • Leeks
  • Marigolds
  • Melons
  • Mints
  • Onions
  • Parsley
  • Peppers
  • Peas
  • Poppies
  • Potatoes
  • Purslane
  • Rosemary
  • Rhubarb
  • Scallions
  • Shallots
  • Strawberries
  • Squash
  • Sunflowers
  • Tarragon
  • Thyme
  • Tomatoes
  • Tomatillos
  • Yarrow
No research seems to be available on the consequences of using ollas in a dense polyculture. However, many other intercrops should work well with buried clay pots. The Fan Sheng-chih Shu, an ancient Chinese text describing clay pot irrigation, recommends planting 10 scallions around the pot, interspersed with four melon seeds, and to harvest them in the 5th month as the melons begin to ripen. Lesser beans can also be planted in with the melons and scallions. If growing root vegetables, like potatoes, then bury the ollas a bit deeper in the soil.

You can plant from cuttings or transplants, or you can raise seedlings in situ instead of transporting them from nurseries. However, ollas are not very good for seed germination, as there won’t be enough surface moisture to water them. A small amount of water should be added to the seed spot or transplant to help wet the soil and establish capillary action from the buried clay pot. If starting with plants that already have roots, water the surface until their roots grow low enough to establish themselves. If planting with cuttings, try setting up a double clay pot to propagate them. Take a sealed pot and set it inside a larger one with an open drain. Fill the space between them with sandy potting mix, and put the cuttings in there. This way, they will be kept moist but still get oxygen.

It has been noted that plants with thick roots, and those with woody perennial plant root growth, will likely grow right through the pots and break them. This makes the pots less useful for long-term tree irrigation, but they can still be used for system establishment. Trials in Pakistan using 8-inch clay pots, refilled every two to four weeks, showed that tree seedlings irrigated with buried clay pots had a survival-rate of 96.5%, compared to 62% for hand watering. The seedlings grown with buried clay pots were also 20% taller. After eight months, all tree seedlings grown around the pots were alive and well, while all of the trees irrigated with the same amount of water using basin irrigation had died. Examination of the root distributions showed that several roots had wrapped themselves around the pot, while two dominant tap roots went straight down to considerable depth. This shows that buried clay pot irrigation can help develop a sufficient root system for long term survival and permanent installation of fruit, nut, and desert trees like pistachio, mesquite, acacia, or eucalyptus. The pot only needs to be filled regularly during the first year and can then be removed.

Be careful when producing fast-growing and spreading plants, like squash and melon vines with big leaves, as they may not be able to get enough water in some situations. Some sensitive species of plants could also be prone to pest or disease because of the constant levels of moisture in the soil. Heavy rains could exacerbate these problems when too much extra moisture is added to the garden. Beware of plants with invasive root systems, as they can grow out horizontally to steal water from the ollas.
When planting with ollas, there is the potential for breakage if left in the ground in areas with a winter freeze. In temperate climates, dig the pots up at the end of the growing season to prevent breakage. Burying the pot further underground, about 4-inches or so under the surface, may help protect it from freezing. The longevity of most ollas (without frost) is unknown, but estimated to be 2- to 5-years, depending on the quality of the clay, the mineral content in the water, and soil temperature swings. Prolonged use is likely to decrease porosity and clog up the pots over time. If this happens, soak the pots in water and scrub them clean, or re-fire to clear out the pores.

ollatable.jpg


Spacing


The correct spacing of your plants will depend on the shape and size of the ollas, and of the crops you’re growing. Not much research is available as to the optimal spacing of plants around the ollas, but some women in the developing world used clay pots with a capacity of 5-liters each, and buried them at 0.5 m intervals in prepared seed beds. Ancient practices buried many pots on large swaths of land, using 530 pits per hectare (210 pits per acre), with each pit being 70 cm (24-inches) across and 12 cm (5-inches) deep. To each pit was added 18 kilograms (38 lbs.) of manure, and mixed well with an equal amount of dirt. An earthen jar of 6-liters (1.5-gallons) was buried in the center of the pit and filled with water to the brink.

Pots of about 1.5-gallons will seep water out to about 18-inches. The general rule of thumb is that each olla will water outwards at a distance about the same length as its radius. For optimal water utilization, arrange the pots in clusters, separated from each other at a distance equal to the width of their diameter or more, and plant in circles around them within about 18-inches around the base of the pot. In general, place your pots about 3 m (9-feet) apart for vine crops, and 1-1.5 m (3- to 5-feet) apart for corn and other tall-growing plants. The seeds or plants should be placed no less than about 1/2 of the radius away from the edge of the pot, and no more than the length equal to the diameter away from the edge, to maximize water absorption. It is helpful to leave a space between plants on one side of the pot to make it easier to lift the lid and refill it as the plants grow larger. You can also use pots in raised beds and containers. Simply use the 1-radius rule to find out how large your containers and beds need to be.
These are good for home growing not in large scale.
 
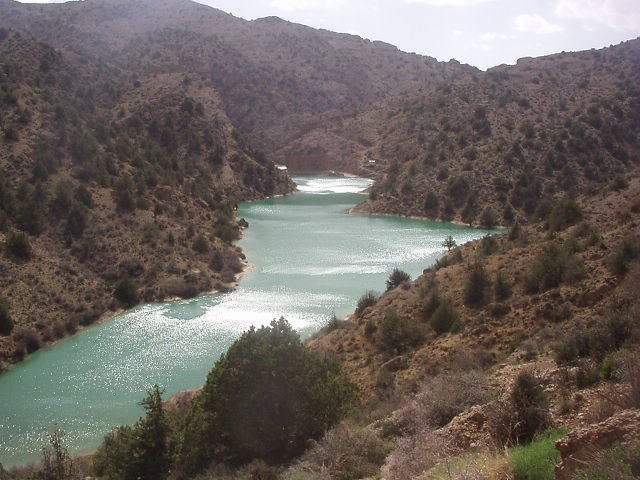
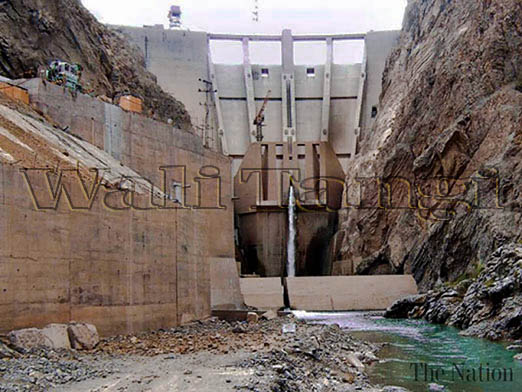
‎Wali-Tangi Dam, ⁦‪Balochistan‬⁩.

‎"The reservoir is at around 8,300 ft, surrounded by 1000 ft plus vertical cliffs of conglomerate, Zarghun-ghar, the highest massif of Balochistan. The area has world's oldest trees (Junipers) and a variety of wild flowers."
‎⁦


Walli_Tangi,_Urak_Valley,_Balochistan,_Pakistan.jpg


usaid-to-provide-funds-for-kurram-tangi-dam-1358285610-2153.jpg


10538479_1523882351167080_6567124401846304670_n.jpg
 
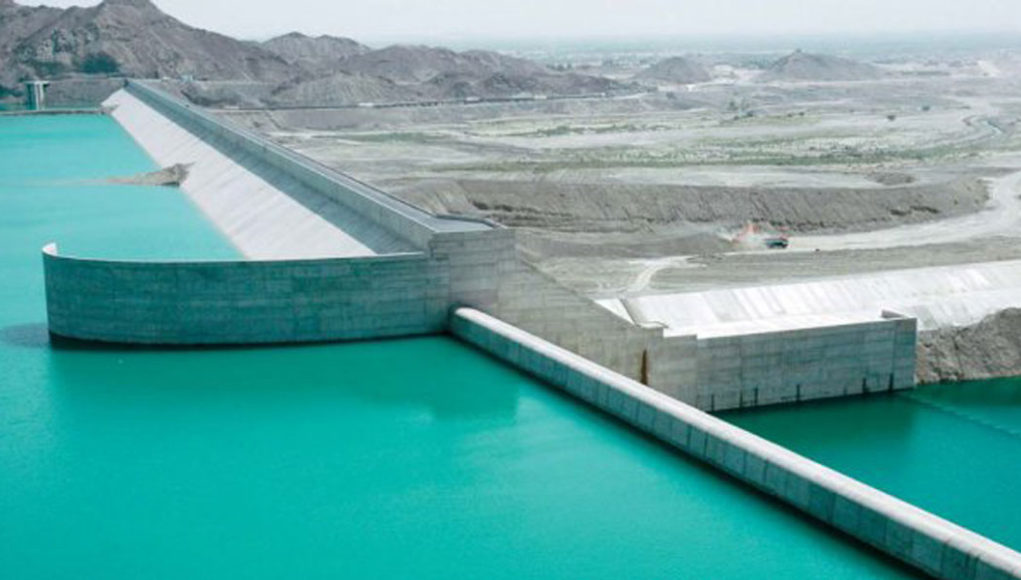
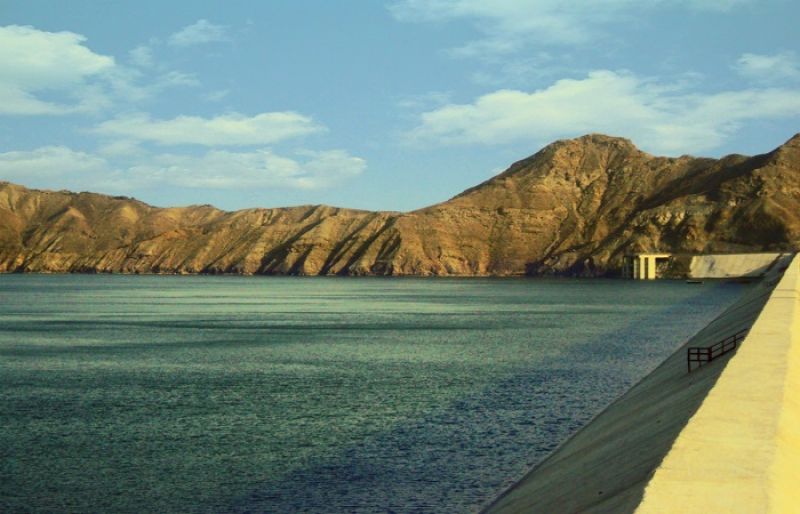
Mirani Dam

Mirani Dam is situated on the Dasht River on south of the Central Makran Range in Kech District of Balochistan the province of Pakistan. It is a standard sized Dam which is used for multi-purpose and is a concrete-faced filled with rock. The Kech River and the Nihing River fed the 302,000 acre feet reservoir of the dam. In 2006, the construction of this dam was accomplished and it took the possession of Dasht River in August 2006. In 2007, the dam successfully resists an extreme flood event due to its quality construction. In Kech Valley the dam is used for irrigation of 33,200 acres and moreover it is also provide drinking water to Turbat and Gwadar.

Mirani-Dam-1021x580.jpg


In 1956, the achievability report of the Mirani dam project was first concluded but due to the other major projects the project of dam went to the back screen. After almost 45 years, in the wake of Gwadar Port development the dam was commissioned in 2001 by Pakistan’s Water and Power Development Authority (WAPDA) in order to supply was to the city of Gwadar. In August 2001, the inauguration of the dam was performed by the president of Pakistan. National Engineering Services Pakistan (NESPAK) designed the dam and in 2002 the construction contract was commenced and then soon after that in 2002 the company commenced its operations and in 2007 the project was completed.

During summer Kech and Nihing streams flow from rainfall and from the mountains the snow melts and enter into the dam. If the constant supply of water is provided to Kech Valley which contains cultivable soil then agricultural activity could be carried out of it. Mirani Dam was basically constructed to store water from three rivers in summers and even in floods in order make available water for irrigation reasons during the whole year to take 33,200 acres of previously unrefined land in Kech Valley under development.


800d913182558b08dc469a794db5eb9d_XL.jpg


The second purpose of its construction was to provide continuous amount of clean drinking water to the municipality of Turbat and Gwadar all over the year. The gross storage of the dam is about 302,000 acre-ft and the live storage is about 52,000 acre.ft. The construction of this dam proved to be a successful project as it fulfills the water requirement of the neighboring cities.

324.jpg
 
Moronj Dam project

WAPDA awarded contract of consultancy services for Moronj Dam project

In order to utilize water resources in South Punjab, WAPDA has awarded a contract award for consulting services for the Morang Dam project. The project will bring economic stability in the region and improve the living standards of the people.

According to WAPDA officials, the contract has been awarded to joint ventures of three companies headed by Nespak. The contract is worth Rs 156.226 million.

The contract includes feasibility study of Morong Dam, detailed engineering design, tender documents and preparation of PC-1. The Morong Dam project will be constructed on Kaha Nala.

Kaha Nala is one of the largest mountain canals on the outskirts of Rajanpur in which the average annual flow of water is 183,000 acre feet. The total storage capacity of the dam will be 800,000 acre
 
The size of the pipeline will be equal to a 10 story building for a small canal.
No. You can use much smaller pipelines because it is protected from direct sunlight which means no evaporation. Do you know how much water actually evaporates before it reaches the other end of the canal? It's insane.
 
CONSULTANCY SERVICES AGREEMENT SIGNED FOR MURUNJ DAM PROJECT


May 29, 2020: In a major development for harnessing scarce water resources in Southern Punjab, the Pakistan Water and Power Development Authority (WAPDA) awarded the consultancy contract worth Rs. 156.226 million to a joint venture headed by NESPAK for feasibility study, detailed engineering design, preparation of tender documents and PC-I of Murunj Dam Project.
WAPDA General Manager (Hydro Planning) Muhammad Amin and NESPAK General Manger (Water and Agriculture) Javed Munir signed the agreement on behalf of WAPDA and the joint venture respectively in a ceremony held at WAPDA House.
Murunj Dam Project will be constructed across Kaha Nullah about 15 Kilometer (Km) from Mari village and 116 Km west of Rajanpur, Punjab. Kaha Nullah is one of the largest hill ******** of the Koh-e-Sulaiman Range located in the vicinity of Rajanpur with average annual inflows of 183,000 acre feet. The available water resources are very scarce in Rajanpur and adjoining areas facing acute shortage of fresh water for drinking and agriculture.
Murunj Dam Project has three main objectives namely storage of water for irrigated agriculture and drinking purpose, flood mitigation and power generation. The project will have gross water storage of 800,000 acre feet. Annual monsoon rains give rise to flashy hill ******** causing inundation of thousands of acres of land in the adjoining foothills and rendering damages to public property and cultivated land each year. The project will generate 12 megawatt (MW) cheap and environmental-friendly electricity. The project is unique in nature for Southern Punjab and will help alleviate poverty from the remote and backward region. It will change existing economic indicators and uplift the living standard of the people. The project will have tangible benefits and bring about 120,000 acre barren land into irrigable, ground water recharging, and fisheries development. Implementation of project will have significant positive impact and uplift of local economy.
 

Latest posts

Back
Top Bottom