Signalian
PDF THINK TANK: CONSULTANT

- Joined
- Aug 18, 2015
- Messages
- 10,608
- Reaction score
- 305
- Country
- Location
Prelude
September 6 every year reminds one of the classic horsed cavalry charge of yore in the smoky haze of the bomb-scarred plains of the Chawinda sector. It was a charge that unhinged the implacable momentum of India’s much vaunted 1st Armoured Division, proving the maxim that offence is the best form of defence. By September 10, four Indian divisions i.e 6 mountain, 14 Infantry, 26 Infantry and 1 Armoured Division attempted a scythe like offensive to cut off the Grand Trunk Road and to capture important communication centres like Sialkot. Pakistan’s 1 Corps, tasked with the Battle for Sialkot, had two divisions to counter the Indian juggernaut. These divisions were 15 Infantry Division deployed to cover the approaches to Sialkot, and 6 armoured division deployed in a defensive role between Aik Nullah and Deg Nadi. An armoured division that was basically an offensive formation was tethered to ground in a static role like an infantry division.
Indian Plan
In front of this assemblage of doughty cavaliers lay the full force of the Indian 1 Corps. Lieutenant General PO Dunn, the commander 1 Indian Corps issued instructions for capture of Phillaurah and subsequent assault on Chawinda by 1 Armoured Division. Major General Rajinder Singh, nicknamed sparrow who was commanding Indian 1st Armoured Division decided to launch his spearhead brigade to capture Phillaurah from North West. His plan was based on the assumption that the Western flank of Pakistani positions at Phillaurah was unguarded and that he could outflank Pakistani positions to hit Pakistani armour concentrated in Gadgor-Chaubara. In order to deceive Pakistani defenders about his main attack he decided to move an armoured brigade towards Gadgor, while his schwerpunkt (Main thrust) was on Phillaurah. Indian 1st Armoured Division was ordered to manoeuvre towards Phillaurah on morning of 11 September with three tank regiments moving abreast. 16 Cavalry moving on Western axis was to establish a blocking position at Khakanwali. The famed 17 Poona Horse was advancing in the centre to capture Libbe, and 4 Hodson’s Horse was moving in the east to cut Road Phillaurah-Chaubara at Saboki.
Action by 25th Cavalry and 11th Cavalry
1 Armoured Brigade’s feint against Gadgor was blunted effectively by the 25 Cavalry which had been deployed in a defensive role by GOC 6 Armoured Division i.e Major General Abrar. He had deployed 6 Armoured Division’s tank and infantry units very intelligently covering all possible approaches to retain flexibility in case of enemy attack from any direction. On 10/11th September the full weight of three tank regiments of the Indian armoured division was directed against Pakistan’s 11 Cavalry less one squadron. The Indian Centurion tanks were far superior to the M36 tank busters of 11 Cavalry (tanks with effective gun but inadequate armour protection). 11 Cavalry fought valiantly but its commanding officer and second in command were seriously wounded along with commanding officer of 1st SP artillery on 11th September. 11 Cavalry lost 16 tanks (nine out of their eleven M36B2 tanks destroyed) and the Indians pressed home the advantage. The situation for Pakistan grew desperate and in order to relieve pressure on 11 Cavalry and 9 FF at Phillaurah and Gadgor, Guide’s Cavalry was told to launch a counterattack against the western flank of the enemy.
Guides Cavalry enters the Battlefield
Guide’s Cavalry of Pakistan Army was a legendary tank regiment with a history going back to 175 years and was also mentioned in the M. M. Kaye’s classic, “The Far Pavilions”. The regiment was led by Lt colonel Amir Gulistan Janjua and had Major Fazl-e-Haq (later Lt General and Governor NWFP) as second in command, while the squadrons were being commanded by Majors Zia uddin Abbasi, Shamim Yaseeen Manto, Abdul Latif Malik and Shah Bahram Khattak. Zia ud Din Abbasi was a debonair young commander of amiable disposition and an infectious sense of humour. Because of the above, he was very popular amongst the officers and soldiers. He was relied upon for his professional competence by the regiment’s second in command, the redoubtable Fazal-e Haq whose gumption and spirit was the rallying point for the entire regiment.
Alpha Squadron was commanded by Major Abdul Latif while Bravo Squadron was commanded by Major Zia ud Din. Both of the squadrons were equipped with M47/48 Patton tanks. The Charlie squadron comprising M36B2 tank destroyers was commanded by Major Shamim Manto.
Guides Cav Alpha squadron - M48 Patton
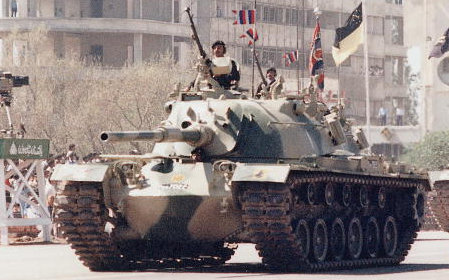
Guides Cav Bravo squadron - M48 Patton

Guides Cav Charlie Squadron - M36B2 Jackson
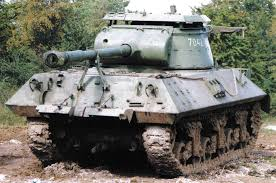
1. Guides Cavalry Vs Indian 16th Cavalry
On September 11, the reconnaissance troop of Guide’s Cavalry encountered Indian 16 Cavalry South of Bhagowal. The troop fell back towards Wadianwala but Major Fazal-e-Haq reached on site and took control of the situation. In the first tank battle three Indian Centurions were knocked down by reconnaissance troops. In the words of Lt General Mehmud in his book, ‘History of Indo-Pak War 1965’, “While the reconnaissance troop was told to remain north of Wadianwala to cover the track leading South of Bhagowal the Guide’s Cavalry was ordered into action against the enemy’s main armoured thrust.” Thus Alpha and Bravo squadrons of the regiment were to blunt the main thrust of Indian armoured division. It was an onerous undertaking and the Guide’s Cavalry took it on with its characteristic panache.
It needs to be understood that in armoured warfare, especially in areas affording more strength to a defending force, the offensive action is always fraught with risks of tank casualties. Other Pakistani armoured units had fought mainly defensive battles in line with the armoured division’s defensive role but here a purely offensive action was assigned to the regiment.
The attack was launched in the old-fashioned style of horsed cavalry with the two squadrons formed up along the railway line. The M47s/48s belched a smoky commotion while champing at the bits like neighing steeds of yore, their steel frames enclosing a pugnacious spirit of old cavaliers, gingered up by the sight of enemy tanks and the raspy sound of their indomitable commander, Amir Gulistan Janjua, who issued his orders on wireless. The cavaliers personified the spirit of red badge of courage in Stephen Crane’s words, “They were going to look at war, the red animal—war, the blood-swollen god. And they were deeply engrossed in this march.” Alpha Squadron charged for its objective i.e Char and captured it by 2 pm. The squadron commander Major Abdul Latif Malik got wounded but pushed back the Indian 16 Cavalry from Khaqanwali.
As per military historians the war diary accounts of Indian 16 Cavalry are reticent on 16 Cavalry’s actions after September 11, most probably due to the drubbing it received at the hands of Guide’s Cavalry, first at Wadianwala and then at Char.
2. Guides Cavalry Vs Indian 17th Poona Horse
The Bravo squadron of the regiment meanwhile commanded by Major Zia ud Din Abbasi ran pell-mell into a fusillade of anti-tank and tank fire from famed 17 Poona Horse in the area of Gil and Khananwali. As one of his troops got pinned down due to heavy resistance, Major Zia ud Din tried to attempt an outflanking manoeuvre and ran into the C squadron of 17 Poona Horse. Major Zia ud Din Abbasi; about which an apocryphal story says that his martyrdom was conveyed to a pious clairvoyant in Mecca in a dream by the Holy Prophet himself, got hit 1000 yards short of his objective by an anti-tank projectile and embraced martyrdom. Thus ended the worldly life of an extremely brilliant and popular officer, in the classic tradition of a charger, embracing death in the saddle. After his martyrdom the squadron was taken over by his young second-in-command, Lieutenant Hussain Shah, who also was hit and embraced martyrdom just short of his objective. While this charge finished another, a threat loomed large on the horizon. News of Indian armoured thrust towards Bhagowal was received.
3. Guides Cavalry Vs Indian 62nd Cavalry
The two squadrons, exhausted after a bold charge, were told to move west and attack the intruding Indian 62 Cavalry. The squadrons dashed for their new objective and their sudden and bold appearance east of Bhagowal forced Indian armour to withdraw. Thus ended the eventful charge of the Guide’s Cavalry on September 11, at the end of which Indians lost 21 tanks as against six of our own tanks. The intrepid chargers of Guide’s cavalry had saved the day for Pakistan. 16 Cavalry remained stuck at their location and the attack caused a mental shock to already cautious Indians whose attacking tactics turned timid despite superiority in numbers. The result was slowing of Indian advance and sapping of offensive spirit resulting in unimaginative battering against well-held Pakistani positions and refusal to go for bold outflanking manoeuvres.
The best lesson out of that plucky charge was that offence is the best weapon in armoured warfare. The country owes a lot to the grit and determination of those fearless chargers who blunted the Indian spear in a classic clash of armour to save the day for Pakistan.
Guides Cavalry Tank losses = 6
Guides Cavalry Tank Kills = 21
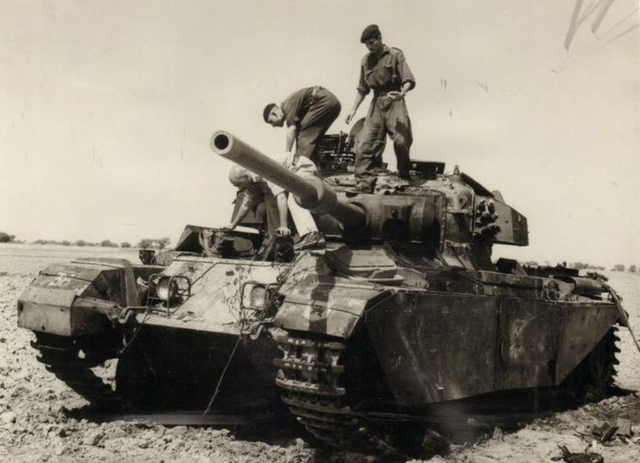
Fate of Indian Centurion Tanks - Destroyed or Captured

 nation.com.pk
 dailytimes.com.pk
September 6 every year reminds one of the classic horsed cavalry charge of yore in the smoky haze of the bomb-scarred plains of the Chawinda sector. It was a charge that unhinged the implacable momentum of India’s much vaunted 1st Armoured Division, proving the maxim that offence is the best form of defence. By September 10, four Indian divisions i.e 6 mountain, 14 Infantry, 26 Infantry and 1 Armoured Division attempted a scythe like offensive to cut off the Grand Trunk Road and to capture important communication centres like Sialkot. Pakistan’s 1 Corps, tasked with the Battle for Sialkot, had two divisions to counter the Indian juggernaut. These divisions were 15 Infantry Division deployed to cover the approaches to Sialkot, and 6 armoured division deployed in a defensive role between Aik Nullah and Deg Nadi. An armoured division that was basically an offensive formation was tethered to ground in a static role like an infantry division.
Indian Plan
In front of this assemblage of doughty cavaliers lay the full force of the Indian 1 Corps. Lieutenant General PO Dunn, the commander 1 Indian Corps issued instructions for capture of Phillaurah and subsequent assault on Chawinda by 1 Armoured Division. Major General Rajinder Singh, nicknamed sparrow who was commanding Indian 1st Armoured Division decided to launch his spearhead brigade to capture Phillaurah from North West. His plan was based on the assumption that the Western flank of Pakistani positions at Phillaurah was unguarded and that he could outflank Pakistani positions to hit Pakistani armour concentrated in Gadgor-Chaubara. In order to deceive Pakistani defenders about his main attack he decided to move an armoured brigade towards Gadgor, while his schwerpunkt (Main thrust) was on Phillaurah. Indian 1st Armoured Division was ordered to manoeuvre towards Phillaurah on morning of 11 September with three tank regiments moving abreast. 16 Cavalry moving on Western axis was to establish a blocking position at Khakanwali. The famed 17 Poona Horse was advancing in the centre to capture Libbe, and 4 Hodson’s Horse was moving in the east to cut Road Phillaurah-Chaubara at Saboki.
Action by 25th Cavalry and 11th Cavalry
1 Armoured Brigade’s feint against Gadgor was blunted effectively by the 25 Cavalry which had been deployed in a defensive role by GOC 6 Armoured Division i.e Major General Abrar. He had deployed 6 Armoured Division’s tank and infantry units very intelligently covering all possible approaches to retain flexibility in case of enemy attack from any direction. On 10/11th September the full weight of three tank regiments of the Indian armoured division was directed against Pakistan’s 11 Cavalry less one squadron. The Indian Centurion tanks were far superior to the M36 tank busters of 11 Cavalry (tanks with effective gun but inadequate armour protection). 11 Cavalry fought valiantly but its commanding officer and second in command were seriously wounded along with commanding officer of 1st SP artillery on 11th September. 11 Cavalry lost 16 tanks (nine out of their eleven M36B2 tanks destroyed) and the Indians pressed home the advantage. The situation for Pakistan grew desperate and in order to relieve pressure on 11 Cavalry and 9 FF at Phillaurah and Gadgor, Guide’s Cavalry was told to launch a counterattack against the western flank of the enemy.
Guides Cavalry enters the Battlefield
Guide’s Cavalry of Pakistan Army was a legendary tank regiment with a history going back to 175 years and was also mentioned in the M. M. Kaye’s classic, “The Far Pavilions”. The regiment was led by Lt colonel Amir Gulistan Janjua and had Major Fazl-e-Haq (later Lt General and Governor NWFP) as second in command, while the squadrons were being commanded by Majors Zia uddin Abbasi, Shamim Yaseeen Manto, Abdul Latif Malik and Shah Bahram Khattak. Zia ud Din Abbasi was a debonair young commander of amiable disposition and an infectious sense of humour. Because of the above, he was very popular amongst the officers and soldiers. He was relied upon for his professional competence by the regiment’s second in command, the redoubtable Fazal-e Haq whose gumption and spirit was the rallying point for the entire regiment.
Alpha Squadron was commanded by Major Abdul Latif while Bravo Squadron was commanded by Major Zia ud Din. Both of the squadrons were equipped with M47/48 Patton tanks. The Charlie squadron comprising M36B2 tank destroyers was commanded by Major Shamim Manto.
Guides Cav Alpha squadron - M48 Patton
Guides Cav Bravo squadron - M48 Patton
Guides Cav Charlie Squadron - M36B2 Jackson
1. Guides Cavalry Vs Indian 16th Cavalry
On September 11, the reconnaissance troop of Guide’s Cavalry encountered Indian 16 Cavalry South of Bhagowal. The troop fell back towards Wadianwala but Major Fazal-e-Haq reached on site and took control of the situation. In the first tank battle three Indian Centurions were knocked down by reconnaissance troops. In the words of Lt General Mehmud in his book, ‘History of Indo-Pak War 1965’, “While the reconnaissance troop was told to remain north of Wadianwala to cover the track leading South of Bhagowal the Guide’s Cavalry was ordered into action against the enemy’s main armoured thrust.” Thus Alpha and Bravo squadrons of the regiment were to blunt the main thrust of Indian armoured division. It was an onerous undertaking and the Guide’s Cavalry took it on with its characteristic panache.
It needs to be understood that in armoured warfare, especially in areas affording more strength to a defending force, the offensive action is always fraught with risks of tank casualties. Other Pakistani armoured units had fought mainly defensive battles in line with the armoured division’s defensive role but here a purely offensive action was assigned to the regiment.
The attack was launched in the old-fashioned style of horsed cavalry with the two squadrons formed up along the railway line. The M47s/48s belched a smoky commotion while champing at the bits like neighing steeds of yore, their steel frames enclosing a pugnacious spirit of old cavaliers, gingered up by the sight of enemy tanks and the raspy sound of their indomitable commander, Amir Gulistan Janjua, who issued his orders on wireless. The cavaliers personified the spirit of red badge of courage in Stephen Crane’s words, “They were going to look at war, the red animal—war, the blood-swollen god. And they were deeply engrossed in this march.” Alpha Squadron charged for its objective i.e Char and captured it by 2 pm. The squadron commander Major Abdul Latif Malik got wounded but pushed back the Indian 16 Cavalry from Khaqanwali.
As per military historians the war diary accounts of Indian 16 Cavalry are reticent on 16 Cavalry’s actions after September 11, most probably due to the drubbing it received at the hands of Guide’s Cavalry, first at Wadianwala and then at Char.
2. Guides Cavalry Vs Indian 17th Poona Horse
The Bravo squadron of the regiment meanwhile commanded by Major Zia ud Din Abbasi ran pell-mell into a fusillade of anti-tank and tank fire from famed 17 Poona Horse in the area of Gil and Khananwali. As one of his troops got pinned down due to heavy resistance, Major Zia ud Din tried to attempt an outflanking manoeuvre and ran into the C squadron of 17 Poona Horse. Major Zia ud Din Abbasi; about which an apocryphal story says that his martyrdom was conveyed to a pious clairvoyant in Mecca in a dream by the Holy Prophet himself, got hit 1000 yards short of his objective by an anti-tank projectile and embraced martyrdom. Thus ended the worldly life of an extremely brilliant and popular officer, in the classic tradition of a charger, embracing death in the saddle. After his martyrdom the squadron was taken over by his young second-in-command, Lieutenant Hussain Shah, who also was hit and embraced martyrdom just short of his objective. While this charge finished another, a threat loomed large on the horizon. News of Indian armoured thrust towards Bhagowal was received.
3. Guides Cavalry Vs Indian 62nd Cavalry
The two squadrons, exhausted after a bold charge, were told to move west and attack the intruding Indian 62 Cavalry. The squadrons dashed for their new objective and their sudden and bold appearance east of Bhagowal forced Indian armour to withdraw. Thus ended the eventful charge of the Guide’s Cavalry on September 11, at the end of which Indians lost 21 tanks as against six of our own tanks. The intrepid chargers of Guide’s cavalry had saved the day for Pakistan. 16 Cavalry remained stuck at their location and the attack caused a mental shock to already cautious Indians whose attacking tactics turned timid despite superiority in numbers. The result was slowing of Indian advance and sapping of offensive spirit resulting in unimaginative battering against well-held Pakistani positions and refusal to go for bold outflanking manoeuvres.
The best lesson out of that plucky charge was that offence is the best weapon in armoured warfare. The country owes a lot to the grit and determination of those fearless chargers who blunted the Indian spear in a classic clash of armour to save the day for Pakistan.
Guides Cavalry Tank losses = 6
Guides Cavalry Tank Kills = 21
Fate of Indian Centurion Tanks - Destroyed or Captured

Cavalry charge by an armour regiment
September 6 every year reminds one of the classic horsed cavalry charge of yore in the smoky haze of the bomb-scarred plains of the Chawinda sector. It was a charge that unhinged the implacable momentum of India’s much vaunted 1st Armoured Divi
 nation.com.pk

Charge of the Guides Cavalry - Daily Times
The Charge of the Guides Cavalry, a famed armoured regiment of the Pakistan Army, has already become part of our 1965, war martial lore due to the valour displayed by its valiant chargers. The following paragraphs are a humble libation to the valiant men who watch over us, revelling and...
