jhungary
MILITARY PROFESSIONAL

- Joined
- Oct 24, 2012
- Messages
- 19,294
- Reaction score
- 387
- Country
- Location
I am starting this thread on my break hoping to create some interest in Tactical Discussion, I may not be here to update this thread as I am going back to school after summer holiday in Australia ended in Jan 30. I am going to write maybe one more artice on Miltiary Tactics and be sticking around before Jan 20 then I am going to disappear from this forum again
I hope that member such as @AUSTERLITZ or @Levina or @PARIKRAMA can update this thread and keep the tactical discussion open for everyone. Meanwhile if you have any question, i'll be around to answer them before Jan 20, afterward. I am sorry, but maybe someone else can help you
So, without further ado, here is the first article.
Battle Tactics 1 - Hammer and Anvil

Introduction
Hammer and Anvil is a classical military tactics, it was used extensively by Alexander the Great during his conquest for half of the known world. Some historian even said it was Alexander the great who created this tactics, tho it's quite doubtful this is the case.
Hammer and Anvil is such a good tactics, even with weapon and engagement changed over time, we can still see its usage by modern military today, and one thing we cannot doubt is that it was hammer and anvil tactic that give birth to a lot of modern military tactics. either from trying to counter it or from modifying it usage over the time.
As such, this tactic deserve to talk about in this battle tactics corner. And it is our number one article.
Background History
Although no one can be certain when exactly is Hammer and Anvil tactics is created, some credited Alexander the Great, no one can be certain when did this tactics was first used in any military conflict. Chances are it was already used either by mean or by accident long before 350BC (bear in mind the earliest record for cavalry is at around 450 to 500 BC.)
However, one thing can be sure is that this tactics is made famous from Alexander the great during his conquer of half the known world.
When Alexander use it, he uses with his companion cavalry match up with heavy or light infantry to act as the Hammer and Anvil effect. It was used quite extensively as a part of his conquering campaign
In a historical sense, hammer and anvil were used numerous time and it's one of the old pillar of military tactics, even with time changed, with the advance weaponry, the hammer and anvil continue to be employed in theatre of war
How does it works?
In short, Hammer and Anvil worked by pinning your enemy, usually less mobile with your own infantry, then using a faster force to envelope your less mobile enemy from behind, thus pinning or hammering your enemy into the anvil (your own infantry) for the slaughter.
By passing or sandwiching your enemy between your lighter but faster force and your heavy and bulkier force, you can, as we say, chop them in the front and stab them in the back, and basically surrounding your enemy from all side, it will force them to fight inn two front, also, by enveloping your enemy, you also cut off their supply.
Easy enough to say, in reality, the success of an Hammer and Anvil tactics would require a number of factors.
1.) Geographic factors - Geographic factors works both ways, meaning it will work for or against both you and your enemy. Putting your enemy in a harsh terrain would ensure disengagement impossible for your slower enemy, however, same terrain will also work against your own fast troop. Theoretically, the best terrain for a Hammer and Anvil tactics is with river or ocean on one side of your enemy, and slope or flatland on the other
2.) Speed - The speed of your fast unit will need to be able to cover the gap between your enemy and their escape route, if your enemy can pull back and disengage before your fast unit converging on their retreat, then this will become a moot point.
However, moving too fast would present another problem, moving too fast would mean your enemy have time to prepare a two front war with your slower unit and your larger unit.
3.) Number and Strength - You need to have strength and number in both your hammer and anvil, your hammer can be of a smaller force, but your anvil must be able to absorb the blow from your enemy. Otherwise, when you hammer your enemy toward the anvil (your infantry), if there are too litter infantry to hold the line, what you basically do is simply hammer your enemy from behind and they broke your line and move forward.
In another words, your anvil must be strong enough, and good enough to take on the grind.
Tactical Consideration
For Hammer and Anvil tactics, there are two distinct considerations for this tactic
1.) Speed is the key, quick in, quick out, make sure your enemy cannot envelope your group, or in modern sense, bring artillery on top of you to bring down your attacks.
In extreme case, your enemy could actually be setting up a trap for you to engage a smaller force, scarified that smaller force and win a local engagement with you with tactical air support or artillery support. Or they will simply roll you over with a bigger force
2.) Anchoring the Hammer and Anvil, although a double Hammer and Anvil do exist (the one which you use cavalry on both side and roll up your enemy on both left and right flank), the anchor point of your tactics should be carefully chosen, the end goal is you want to roll up your enemy from behind, meaning you will need to anchor your infantry and your fast unit (in this case cavalry) to close a circle. otherwise you are routing your enemy, but not feeding them into your infantry grinder.
Counter Tactics
In some way, this tactics cannot be stopped once it started. But there are several thing you can do to push this tactics if you are in one.
1.) Using your fast troop to engage the hammer. Very old tactics, not quite useful today, but worked well in the old days, what you simply do is to crash your own cavalry (If you have them) into the hammer paths, and if you can destroy or disrupt the hammer blow, you will force your enemy back into a grinding war.
And because it usually mean your enemy have inferior number or strength (otherwise they would simply do a head on attack) Which mean you can usually crashed the anvil and break out.
2.) Using your own fast troop as a hammer. If terrain allowed (therefore this is such an important requirement for this tactics), you can simply replicate your enemy by launching your own hammer and anvil attacks, that way, we can see who break first and who break first, loses.
3.) More modern technique would call for a defensive approach with air/land/sea interdiction. It will be harder for modern warfare to pull off such a tactics, one thing is the advancement of secondary bombardment. Today, unlike ancient time, troop can be interdicted with ranged weaponry (such as Howitzer or Artillery) and the approach can be mined so the fast unit (such as tank) could be bogged down by defensive measure, as speed is the key, this will work against the tactic'
While most people believe a refused flank can help with defending the Hammer and Anvil tactics, this have proven in battle of Cannae as false, the hammer can simply stretch to a point it can still roll up your flank, and because the cavalry is mobile, they can simply go around your refused flank and attack you from the rear.
Case Studies
Battle of Gaugamela - October 1, 330 BC

The prime example for Alexander the Great with his companion cavalry using the Hammer and Anvil Tactic to destroy the Persian left flank.
Alexander, with his 47,000 troop, engaging a large Persian force led by King Darius III numbered from 60,000 to 90,000 troop and cavalry.
Holding the main Macedonian line is 30,000 heavy pike man of the Alexander Phalanx formation, with 9,000 supporting light infantry, and 7,000 companion cavalry, Alexander the Great laid out his battle line with a double refused flank formation looks like a Trapezium Shape. With both Cavalry unit on the side, arch back 45 degrees, and the main Phalanx on the center battle line, back up with light infantry and reserves.
Darius spread his force in a straight line, with both cavalry and chariot on the side, infantry in the center.
The battle open with Darius engaging both flank on Alexander's line in a cavalry battle, meanwhile the charging Persian engage the phalanx formation in the center. The last bit of the puzzle is for Darius to use his chariots onto Alexander command line, which in turn opening up a gap for Alexander to charge thru. While the chariot attack was either intercepted or rendered harmless by opening up the Macedonian rank and let the chariot harmlessly passed.
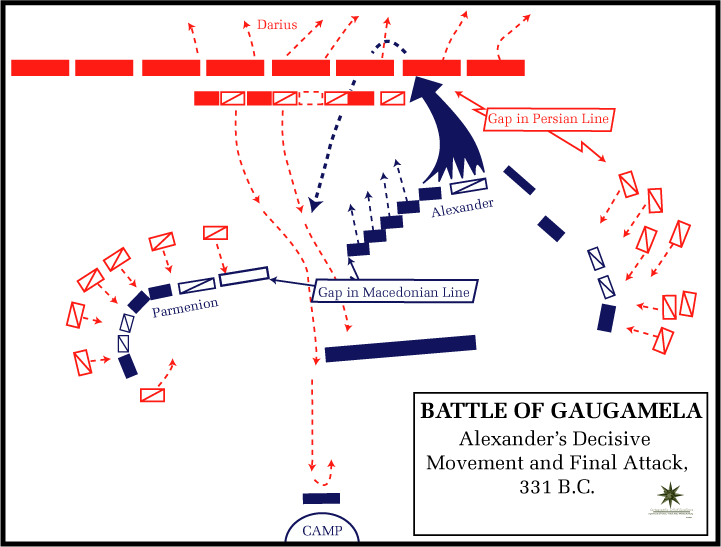
Seizing the gap with the confused Persian cavalry and chariot, Alexander charged thru the gap with his companion cavalry, using his reserve phalanx to hold down the Persian cavalry attacks..
After smashing into the Persian infantry line, Alexander return and engage the Persian line from behind, thus, hammering the Persian front line into Alexander's own Phalanx formation.
At this stage, both Persian center and left flanks collapsed, and king Darius escaped, only the Persian right and center right remain as a viable force, which threaten to roll over Alexander's own left flank, eventually Alexander own force reinforced their left flank and repelled the Persian attacks. But not before some Persian troop broke thru and looting Alexander's camp.
The overall battle is a success, with Alexander force being in a 2 on 1 long way (8/90,000 Persian v 47,000 Macedonian) and in particular, Persian cavalry outnumber Alexander's cavalry 2 or 3 to 1. The clever use of Hammer and Anvil save the day for Alexander
Battle of Cannae - August 2, 216 BC
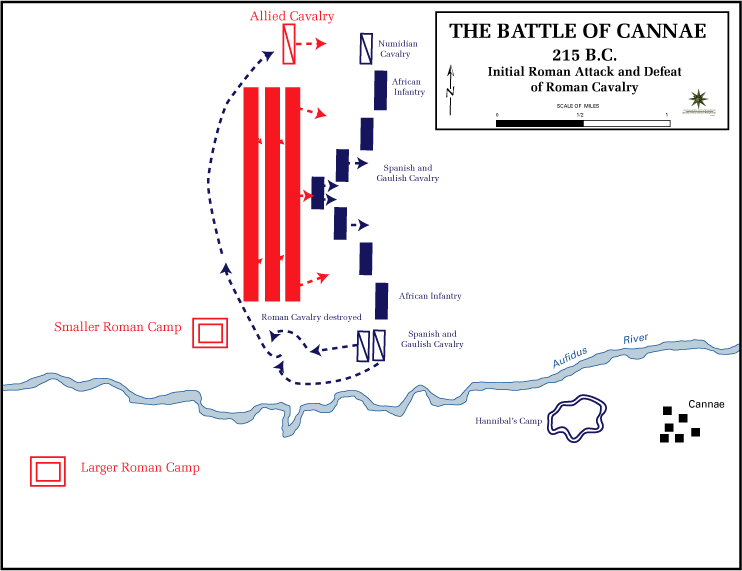
Battle of Cannae is fought between Roman Empire and Carthage on Cannae, modern day southern Italy.
Carthaginian force numbered in 57,000 while Roman send out 8 Legions (instead of the usual 4) numbering between 50,000 o 60,000 (with high estimate to 80,000) troops. Mostly foot soldier, with roman fighting technique, these force would have been heavily armed and more importantly, heavily armored.
The Carthaginian position their troop in two reverse echelon, resembling a triangle. With the African infantry and Spanish cavalry in the center flanked by Spanish and Numidian cavalry on the flank.
The Roman have their usual legion march formation, packing their troop in a tight rectangular shape and march with discipline
With both side march into each other, Roman held their formation while the Carthage change his formation with and extended convex shape resembling a slight half oval or semicircle (depending on which source you read) but in all, the Carthage line draw back at the center, with the Spanish cavalry prepare to break rank. This shape also give the Carthage a longer line which best to absorb the initial roman smash because of the shape.
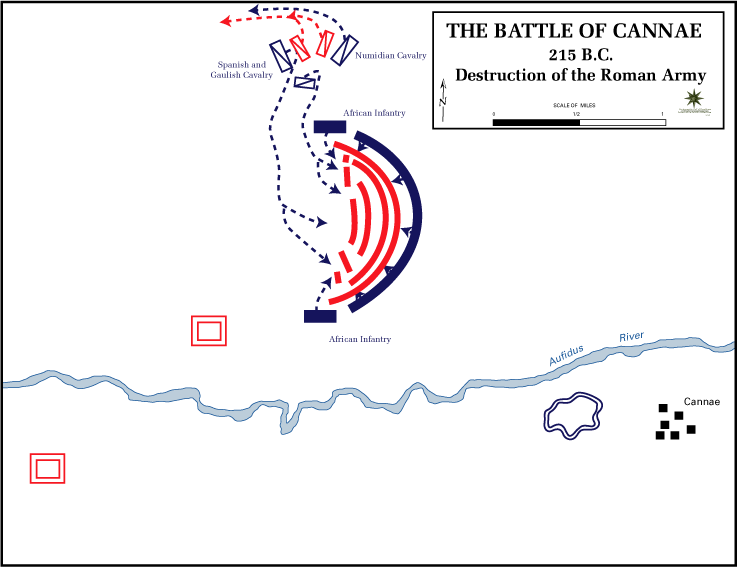
Battle started with both Carthage flank attack both Roman cavalry, routing the Roman cavalry early on in the battle, leave behind the Roman infantry, early in the battle, with the Roman infantry engaging the Carthage infantry in the middle, the Carthage pull back the center to stretch the line and absorb the shock from the Roman, as the line stretch longer and curvier, the Roman rooted deep into the Carthage rank, but at this point, Hannibal order the Libyan infantry, which is heavy pike man, to engage and roll up both flank of Roman rank, which is now deep inside the Carthage line. to round up the attack, the Spanish cavalry then roll to the back of the Roman Legions and completely surrounded the Romans.
Both African infantry and Spanish cavalry then hammer the Roman into the Carthage main line, which comprise of mostly Gaul and Iberian infantry, which is fierce hand to hand fighter.
As such, the Roman cannot chew thru the Iberian and Gaul line and at the same time being hammered in the back, and the attack fall apart. estimated 40,000 roman (or 6 Legions) decimated in this battle, and Carthage win the battle with an overall 2 to 1 odds.
Battle of Baghdad - April 3 - 12, 2003 AD
One of the battle I have actually fought myself, on the eve of the invasion of Iraq, the US military prepared a two front war headed by a mixed British and US Marine on the southern route, and US 3d Infantry division on the western route, this is the latest known example of Hammer and Anvil being use in modern warfare.

US Marine and the British force, numbering about 18,000 ill attack town after town thru Barsa, Qul'at, al-Kut and then onto Baghdad to the south, on the other hand, US 3d ID will attack along a Western route, smashing thru Nasiriya, Najaf, Karbala and then hook right into Baghdad from the West.
While the majority of Iraqi Republic guard will fight along the line of the US Marine and the British force, majority of them will ten be trapped between the US Marine to the south and the US 3d Infantry to the west, also with 173rd Airborne brigade airdropped to tikrit North of Baghdad, cutting off the Republic guard retreat.
In all, the US will have 30,000 soldier amongst the 1st Marine Division, 3rd infantry division, 173 independent airborne brigade and the British force. Facing off 50,000 Iraqi republic guard littered around both US forces objective.

US Marine tasked to take both Al-Kut and Nasiriya with minor casualty. while the US 3rd Infantry took Najaf and Karbala and move onto the Baghdad International in the West, from there, they used the BIA as the forward base and attack Baghdad from North West, where the Marine is approaching from the south, while the 3rd Infantry battle on the West and secure 3 ring road around the City of Baghdad, taking objective Moe, Larry and Curley from south west to north west, and taking Objective Diane.
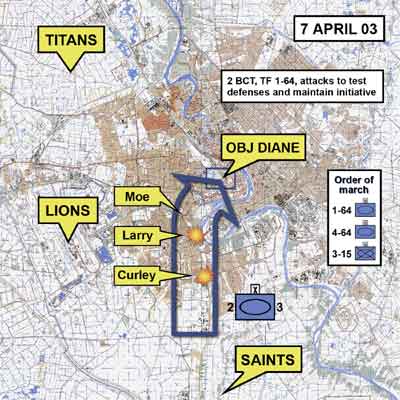
The job of 64th Armored Regiment of the 3d ID is to force the Iraqi republic guard out of their position and move south by cutting from South West to North, and force them onto the Marine line, by which time, have established road block to the south of the city.
Rounding out the battle, the US loses at about 34 KIA with 5-600 WIA of their 30,000 troop, Iraqi suffered 2500+ KIA in the fight and unknown number of WIA, this has been contributed to the hammer and anvil effect started by the tanks of 3d ID.
Author : Gary Locke, BA International Affair CU Boulder, MPhil Strategic Studies, Australian National University, Captain US Army, 3d Infantry Division
All Right Reserved, do not copy or redirect this article without author permission
I hope that member such as @AUSTERLITZ or @Levina or @PARIKRAMA can update this thread and keep the tactical discussion open for everyone. Meanwhile if you have any question, i'll be around to answer them before Jan 20, afterward. I am sorry, but maybe someone else can help you
So, without further ado, here is the first article.
Battle Tactics 1 - Hammer and Anvil
Introduction
Hammer and Anvil is a classical military tactics, it was used extensively by Alexander the Great during his conquest for half of the known world. Some historian even said it was Alexander the great who created this tactics, tho it's quite doubtful this is the case.
Hammer and Anvil is such a good tactics, even with weapon and engagement changed over time, we can still see its usage by modern military today, and one thing we cannot doubt is that it was hammer and anvil tactic that give birth to a lot of modern military tactics. either from trying to counter it or from modifying it usage over the time.
As such, this tactic deserve to talk about in this battle tactics corner. And it is our number one article.
Background History
Although no one can be certain when exactly is Hammer and Anvil tactics is created, some credited Alexander the Great, no one can be certain when did this tactics was first used in any military conflict. Chances are it was already used either by mean or by accident long before 350BC (bear in mind the earliest record for cavalry is at around 450 to 500 BC.)
However, one thing can be sure is that this tactics is made famous from Alexander the great during his conquer of half the known world.
When Alexander use it, he uses with his companion cavalry match up with heavy or light infantry to act as the Hammer and Anvil effect. It was used quite extensively as a part of his conquering campaign
In a historical sense, hammer and anvil were used numerous time and it's one of the old pillar of military tactics, even with time changed, with the advance weaponry, the hammer and anvil continue to be employed in theatre of war
How does it works?
In short, Hammer and Anvil worked by pinning your enemy, usually less mobile with your own infantry, then using a faster force to envelope your less mobile enemy from behind, thus pinning or hammering your enemy into the anvil (your own infantry) for the slaughter.
By passing or sandwiching your enemy between your lighter but faster force and your heavy and bulkier force, you can, as we say, chop them in the front and stab them in the back, and basically surrounding your enemy from all side, it will force them to fight inn two front, also, by enveloping your enemy, you also cut off their supply.
Easy enough to say, in reality, the success of an Hammer and Anvil tactics would require a number of factors.
1.) Geographic factors - Geographic factors works both ways, meaning it will work for or against both you and your enemy. Putting your enemy in a harsh terrain would ensure disengagement impossible for your slower enemy, however, same terrain will also work against your own fast troop. Theoretically, the best terrain for a Hammer and Anvil tactics is with river or ocean on one side of your enemy, and slope or flatland on the other
2.) Speed - The speed of your fast unit will need to be able to cover the gap between your enemy and their escape route, if your enemy can pull back and disengage before your fast unit converging on their retreat, then this will become a moot point.
However, moving too fast would present another problem, moving too fast would mean your enemy have time to prepare a two front war with your slower unit and your larger unit.
3.) Number and Strength - You need to have strength and number in both your hammer and anvil, your hammer can be of a smaller force, but your anvil must be able to absorb the blow from your enemy. Otherwise, when you hammer your enemy toward the anvil (your infantry), if there are too litter infantry to hold the line, what you basically do is simply hammer your enemy from behind and they broke your line and move forward.
In another words, your anvil must be strong enough, and good enough to take on the grind.
Tactical Consideration
For Hammer and Anvil tactics, there are two distinct considerations for this tactic
1.) Speed is the key, quick in, quick out, make sure your enemy cannot envelope your group, or in modern sense, bring artillery on top of you to bring down your attacks.
In extreme case, your enemy could actually be setting up a trap for you to engage a smaller force, scarified that smaller force and win a local engagement with you with tactical air support or artillery support. Or they will simply roll you over with a bigger force
2.) Anchoring the Hammer and Anvil, although a double Hammer and Anvil do exist (the one which you use cavalry on both side and roll up your enemy on both left and right flank), the anchor point of your tactics should be carefully chosen, the end goal is you want to roll up your enemy from behind, meaning you will need to anchor your infantry and your fast unit (in this case cavalry) to close a circle. otherwise you are routing your enemy, but not feeding them into your infantry grinder.
Counter Tactics
In some way, this tactics cannot be stopped once it started. But there are several thing you can do to push this tactics if you are in one.
1.) Using your fast troop to engage the hammer. Very old tactics, not quite useful today, but worked well in the old days, what you simply do is to crash your own cavalry (If you have them) into the hammer paths, and if you can destroy or disrupt the hammer blow, you will force your enemy back into a grinding war.
And because it usually mean your enemy have inferior number or strength (otherwise they would simply do a head on attack) Which mean you can usually crashed the anvil and break out.
2.) Using your own fast troop as a hammer. If terrain allowed (therefore this is such an important requirement for this tactics), you can simply replicate your enemy by launching your own hammer and anvil attacks, that way, we can see who break first and who break first, loses.
3.) More modern technique would call for a defensive approach with air/land/sea interdiction. It will be harder for modern warfare to pull off such a tactics, one thing is the advancement of secondary bombardment. Today, unlike ancient time, troop can be interdicted with ranged weaponry (such as Howitzer or Artillery) and the approach can be mined so the fast unit (such as tank) could be bogged down by defensive measure, as speed is the key, this will work against the tactic'
While most people believe a refused flank can help with defending the Hammer and Anvil tactics, this have proven in battle of Cannae as false, the hammer can simply stretch to a point it can still roll up your flank, and because the cavalry is mobile, they can simply go around your refused flank and attack you from the rear.
Case Studies
Battle of Gaugamela - October 1, 330 BC
The prime example for Alexander the Great with his companion cavalry using the Hammer and Anvil Tactic to destroy the Persian left flank.
Alexander, with his 47,000 troop, engaging a large Persian force led by King Darius III numbered from 60,000 to 90,000 troop and cavalry.
Holding the main Macedonian line is 30,000 heavy pike man of the Alexander Phalanx formation, with 9,000 supporting light infantry, and 7,000 companion cavalry, Alexander the Great laid out his battle line with a double refused flank formation looks like a Trapezium Shape. With both Cavalry unit on the side, arch back 45 degrees, and the main Phalanx on the center battle line, back up with light infantry and reserves.
Darius spread his force in a straight line, with both cavalry and chariot on the side, infantry in the center.
The battle open with Darius engaging both flank on Alexander's line in a cavalry battle, meanwhile the charging Persian engage the phalanx formation in the center. The last bit of the puzzle is for Darius to use his chariots onto Alexander command line, which in turn opening up a gap for Alexander to charge thru. While the chariot attack was either intercepted or rendered harmless by opening up the Macedonian rank and let the chariot harmlessly passed.
Seizing the gap with the confused Persian cavalry and chariot, Alexander charged thru the gap with his companion cavalry, using his reserve phalanx to hold down the Persian cavalry attacks..
After smashing into the Persian infantry line, Alexander return and engage the Persian line from behind, thus, hammering the Persian front line into Alexander's own Phalanx formation.
At this stage, both Persian center and left flanks collapsed, and king Darius escaped, only the Persian right and center right remain as a viable force, which threaten to roll over Alexander's own left flank, eventually Alexander own force reinforced their left flank and repelled the Persian attacks. But not before some Persian troop broke thru and looting Alexander's camp.
The overall battle is a success, with Alexander force being in a 2 on 1 long way (8/90,000 Persian v 47,000 Macedonian) and in particular, Persian cavalry outnumber Alexander's cavalry 2 or 3 to 1. The clever use of Hammer and Anvil save the day for Alexander
Battle of Cannae - August 2, 216 BC
Battle of Cannae is fought between Roman Empire and Carthage on Cannae, modern day southern Italy.
Carthaginian force numbered in 57,000 while Roman send out 8 Legions (instead of the usual 4) numbering between 50,000 o 60,000 (with high estimate to 80,000) troops. Mostly foot soldier, with roman fighting technique, these force would have been heavily armed and more importantly, heavily armored.
The Carthaginian position their troop in two reverse echelon, resembling a triangle. With the African infantry and Spanish cavalry in the center flanked by Spanish and Numidian cavalry on the flank.
The Roman have their usual legion march formation, packing their troop in a tight rectangular shape and march with discipline
With both side march into each other, Roman held their formation while the Carthage change his formation with and extended convex shape resembling a slight half oval or semicircle (depending on which source you read) but in all, the Carthage line draw back at the center, with the Spanish cavalry prepare to break rank. This shape also give the Carthage a longer line which best to absorb the initial roman smash because of the shape.
Battle started with both Carthage flank attack both Roman cavalry, routing the Roman cavalry early on in the battle, leave behind the Roman infantry, early in the battle, with the Roman infantry engaging the Carthage infantry in the middle, the Carthage pull back the center to stretch the line and absorb the shock from the Roman, as the line stretch longer and curvier, the Roman rooted deep into the Carthage rank, but at this point, Hannibal order the Libyan infantry, which is heavy pike man, to engage and roll up both flank of Roman rank, which is now deep inside the Carthage line. to round up the attack, the Spanish cavalry then roll to the back of the Roman Legions and completely surrounded the Romans.
Both African infantry and Spanish cavalry then hammer the Roman into the Carthage main line, which comprise of mostly Gaul and Iberian infantry, which is fierce hand to hand fighter.
As such, the Roman cannot chew thru the Iberian and Gaul line and at the same time being hammered in the back, and the attack fall apart. estimated 40,000 roman (or 6 Legions) decimated in this battle, and Carthage win the battle with an overall 2 to 1 odds.
Battle of Baghdad - April 3 - 12, 2003 AD
One of the battle I have actually fought myself, on the eve of the invasion of Iraq, the US military prepared a two front war headed by a mixed British and US Marine on the southern route, and US 3d Infantry division on the western route, this is the latest known example of Hammer and Anvil being use in modern warfare.
US Marine and the British force, numbering about 18,000 ill attack town after town thru Barsa, Qul'at, al-Kut and then onto Baghdad to the south, on the other hand, US 3d ID will attack along a Western route, smashing thru Nasiriya, Najaf, Karbala and then hook right into Baghdad from the West.
While the majority of Iraqi Republic guard will fight along the line of the US Marine and the British force, majority of them will ten be trapped between the US Marine to the south and the US 3d Infantry to the west, also with 173rd Airborne brigade airdropped to tikrit North of Baghdad, cutting off the Republic guard retreat.
In all, the US will have 30,000 soldier amongst the 1st Marine Division, 3rd infantry division, 173 independent airborne brigade and the British force. Facing off 50,000 Iraqi republic guard littered around both US forces objective.
US Marine tasked to take both Al-Kut and Nasiriya with minor casualty. while the US 3rd Infantry took Najaf and Karbala and move onto the Baghdad International in the West, from there, they used the BIA as the forward base and attack Baghdad from North West, where the Marine is approaching from the south, while the 3rd Infantry battle on the West and secure 3 ring road around the City of Baghdad, taking objective Moe, Larry and Curley from south west to north west, and taking Objective Diane.
The job of 64th Armored Regiment of the 3d ID is to force the Iraqi republic guard out of their position and move south by cutting from South West to North, and force them onto the Marine line, by which time, have established road block to the south of the city.
Rounding out the battle, the US loses at about 34 KIA with 5-600 WIA of their 30,000 troop, Iraqi suffered 2500+ KIA in the fight and unknown number of WIA, this has been contributed to the hammer and anvil effect started by the tanks of 3d ID.
Author : Gary Locke, BA International Affair CU Boulder, MPhil Strategic Studies, Australian National University, Captain US Army, 3d Infantry Division
All Right Reserved, do not copy or redirect this article without author permission
